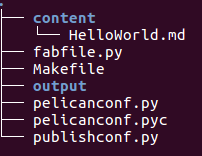
We will be able to extract the full juice of pelican once we understand the building blocks of the pelican blog. Folder structure and some files forms the basic of this. We will understand some of these files and folder use in this post.
After the first blog post if we give make clean command we will see a folder structure just like this. This will have an empty output folder.

We will understand the use of these folder and a proper way of managing your content.
content folder
This is the folder where all the magic happens. This is the root folder for our all content, we can use this folder for these purposes.
- Writing content
- Saving the images references in the content
- Static Pages (ex: about, contact etc)
- folder for storing our favicon.ico and apple icon
Writing Content
In traditional wordpress or most of the blogging platform the content is stored in this format /2015/05/24/my-content/ now this may be what some people might be happy with and you can also do the same, but this impacts the SEO ranking as the path becomes long and the date when the content was created has no significance to the actual content but is occupying space on the URL. In my opinion we can better organize our self with some meaning full structure.
What we can do is we can create a folder in side content named articles and the sub folders inside articles for each category which you want to write or if you want to have a flat system you can place all your content inside articles. I prefer the sub folder approach as we can derive the category name just from the folder name.
So go ahead for beginning create a folder inside content name articles
cd content/
mkdir articles
Now create your second post inside this and publish the content based on the command we learned on the previous post.
Now if you launch the localhost:8000, and click on the article title, you will see no difference but if you see on the URL bar, we still see that our post is without the article folder structure. We did not want this. Have a look

In order to get the proper URL in the address bar we have to change somethings in the pelicanconf.py, we will explain what is the purpose of this file in a short file for not just add these 3 line into that config.
ARTICLE_PATHS = ['articles',]
ARTICLE_URL = 'articles/{slug}.html'
ARTICLE_SAVE_AS = 'articles/{slug}.html'
With is configuration in the config folder, just generate the blog with the commands already learned and then check the localhost:8000. It should look like this.

Now we have a proper folder structure.
Static Pages
Most often than not we will want some pages which will rarely change, like an About and a Contact pages. These type of static pages is also supported in the pelican blog. Just create a folder named pages inside content folder like this.
cd content/
mkdir pages
Now we are ready to make our sample About.md and Contact.md inside pages directory.
Title: About
Date: 2017-04-14 22:30
Modified: 2017-04-14 22:30
Slug: About
Author: username
Summary: This is a sample blog.


The About Page for the blog.
and Contact.md
Title: Contact
Date: 2017-04-14 22:30
Modified: 2017-04-14 22:30
Slug: Contact
Author: username
Summary: This is a sample blog contact page.


The Contact Page for the blog.
We again generate the blog and check it on localhost:8000.
When we see the output of pelican content command we will see this.
Done: Processed 1 article, 0 drafts, 2 pages and 0 hidden pages in 0.20 seconds.
Which means that, the pages are generated. When we launch the localhost:8000. we will see that the About and Contact menu like this

We can modify these pages with the information which you want to furnish.
Static Images
Most often than not we will use images to link in our blogs, we can store all these images inside the content folder, having a directory called images. Do this by following these commands.
cd content/
mkdir images
Now we can copy any image inside this folder and try to link it into one of our blog. Just copy any image in this folder and copy the file name.
Now create a link to this file inside the already existing blog post by the help of link of markdown, here is a sample.

We should understand some details about the above piece of code.
Hello World 1- The
alttext is good if there is a browser which block image, thisalttext is displayed, showing an information about what this images were supposed to do.
- The
"Hello World 2"- This is the
titleof the image, which is shown as a tool tip once we hover over the image.
- This is the
{static}- This is a special syntax which is used by pelican to generate links, so be it URL or images, when using relative URLs kindly use this format.
We have covered most of the folder structure inside article we will see the configuration files in the next blog post.
