We have set the basic blog, though it may not look great because of the theme which we are using, but we will change those. Presently we will focus on taking this blog for the world to see. Github Pages is the way to publish your blog on to the WWW.
We will have 2 repositories for doing this.
- One repository is for the source, which is our blog content.
- Second repository is for the generated files in the
outputfolder.
Prerequisite
We all should have a GitHub account, if you have then continue, else go to GitHub and create an account. The process is very straight forward, just follow the instruction on the website.
The git should be locally configured. Kindly follow the steps mention in this page Setting your email in Git.
The first Repository
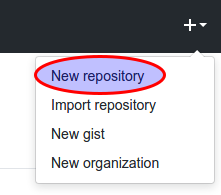
We should now create our first Repository onto github. Click on the + icon which shows this drop down.

And click on the option New Repository as shown above.
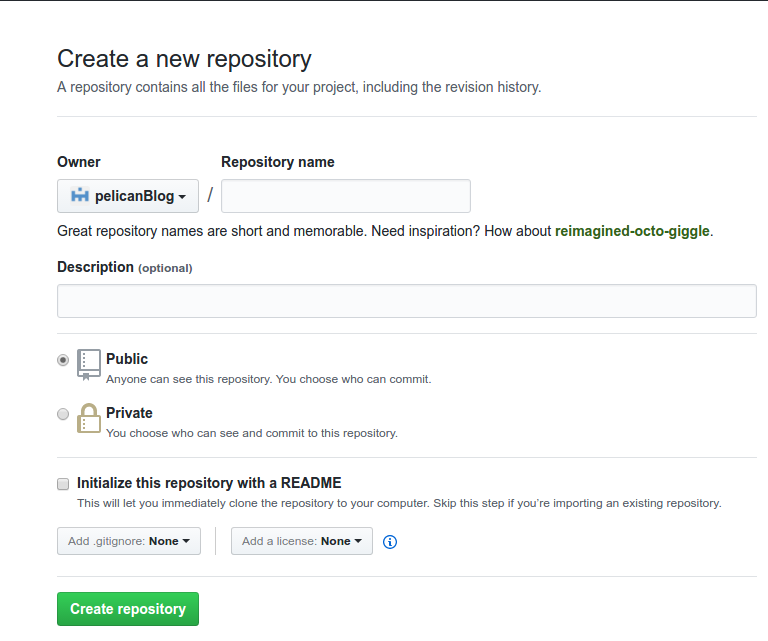
This will open up a page with looks like this

Fill in the repository name which you want to name, and write a little Description also do not click on the check-box which read
Initialize this repository with a README
Since we already have a folder in our local system, to check-in we can leave this box unchecked. In future if need we can create a README file manually.
Once you click on the Create Repository link, you will be taken to this page, with these as a content.

This is the symbol of empty repository which is created and now we can push our local code to this folder.
Push code from local to Github repository
We can follow the instruction mentioned above to push our local code to github, but we have to make sure that we do not push the output directory in the same repository as the code, because the handling of output directory is different.
Go to the root of the folder, where your blog is kept.
cd ~/mySampleBlog/- Go to the root of the directory where the blog post are kept
git init- This command initializes an empty repository in the same folder.
- Create a file named
.gitignorein the same folder. - Copy the below content to the
.gitignorefile.
*~
._*
*.lock
*.DS_Store
*.swp
*.out
*.py[cod]
output
- The above code basically prevents all the local temporary files and the
outputdirectory to be checked in. git status- This command will make sure that the
outputfolder is not tracked by git, check the output as shown below.
- This command will make sure that the
On branch master

Initial commit

Untracked files:
  (use "git add <file>..." to include in what will be committed)

    .gitignore
    Makefile
    content/
    fabfile.py
    pelicanconf.py
    publishconf.py

nothing added to commit but untracked files present (use "git add" to track)
- Only files listed above will be tracked, and
outputdirectory is not one of them. git add .- Adds all the above files to be ready for commit.
git commit -m "first commit"- This will make a commit locally with the commit message as
first commit
- This will make a commit locally with the commit message as
git remote add origin https://github.com/pelicanBlog/mySampleBlog.git- This commands connects the remote repository of github with our local code. The URL might be different for you.
git push -u origin master- This will push the local changes to the GitHub repository we created.
- It will ask for your username and password, kindly provide those and we have pushed our code to github.
Pushing the output folder
The output folder is out actual blog, so this is a little different from the previous way of pushing code to github.
Please follow along to create this special repository.
- Select the same
New Repositoryfrom the+icon shown in previous repository. - In the New Repository form, the magic happens with the
Repository Namefield, fill in the name asusername.github.io, whereusernameis your github username. - Fill In the description.
- Now there are two ways to push the
outputfolder to this new repository, you can follow any one of them.- Push the
outputfolder as a repository which we already know.git initgit add .git commit -m "first commit"git remote add origin https://github.com/pelicanBlog/pelicanBlog.github.io.gitgit push -u origin master- After the above command, just launch this URL in your browser,
https://username.github.io/, just changeusernamewith your username.
- Since the original source folder we create with
outputdirectory mentioned in.gitignore, we can now add this repository as a submodule in that repository, to provide a link between both the source and theoutput- Go to the root of the blog content, in this case
cd ~/mySampleBlog git submodule add -f https://github.com/pelicanBlog/pelicanBlog.github.io.git output- This adds the
outputfolder as a submodule.
- This adds the
git commit -m "added submodule"git push -u origin master- The above will make the
outputas a submodule
- The above will make the
- Go to the root of the blog content, in this case
- Push the
With this we have completed our part of the blog series. With this series of blog post we are able to achieve this.
- Understand what is pelican blog and how to use it with github pages.
- How to set up the Anaconda environment for pelican development.
- Understood what
pelican-quickstartcommand does. - Understood the basic commands to generate the pelican blog
- Understood the basic folder structure of the pelican blog
- Understood the pelican settings files and its uses.
- Created a github pages and pushed both our content and the blog post to it.
The next series will focus into
- How to configure a domain with github pages.
- Use of a themes and plugin to enhance the website
- Integration with google analytics, mail chimp etc.
- Modifying the blogs to get the most out of the themes.
Reference
- Github Help
- Setting your email in Git
- git-submodule
- How to publish a pelican site on Github
- Github Pages
